


Welcome! In this tutorial, we will learn how to create a React project using the GitHub API. We will cover how to fetch and post data from the API and implement React Router for navigation between pages. This is a great project to add to your portfolio. Let's get started!
Prerequisite
Before starting this tutorial, it is recommended that you have:
A basic understanding of Javascript
A basic understanding of SASS
Familiarity with a React App
A GitHub account
Setting up the project
Create a folder in your desired location.
mkdir github-react
This will create a new folder called github-react in your specified path.
Next, we would go into the newly created folder and create our react app
# To enter into the folder
cd github-react

# Create a react boilerplate using the create-react-app
# NPM
npx create-react-app github-react
# YARN
yarn create react-app github-react
To enable seamless navigation between pages, we will need to install React Router.
# using npm
npm install react-router-dom

# using yarn
npm install react-router-dom
In this tutorial, we will be using SASS, a CSS preprocessor with superpowers plus I think it's a great tool, so we need to install it before proceeding.
# using npm
npm install node-sass --save

# using yarn
yarn add node-sass
Your project should look something like this.

Getting GitHub Credentials
In order for your react project to communicate with GitHub API, you need to generate a token by visiting github.com/settings/tokens.
However, be careful about pushing API tokens to GitHub as it can lead to security issues such as account suspension or someone accessing and deleting data from your online hosted database. To do this we use the file named .env this is where you put all your important, private, and security info.
Our .env should look like this
REACT_APP_TOKEN=the_token_you_get_from_github
REACT_APP_GITHUB_URL=https://api.github.com
State management
To manage complex states across the project, we will use React Context. Create a file called "RepoContext" in the root of our project at the following path: ./src/RepoContext.jsx.
import React from "react";
import { createContext, useState } from "react";

const RepoContext = createContext();

export function RepoProvider({ children }) {
  const [repos, setRepos] = useState([]);

  //manage Repos
  const getRepos = (data) => {
    setRepos([data]);
  };

  return (
    <RepoContext.Provider value={{ repos, getRepos }}>
      {children}
    </RepoContext.Provider>
  );
}

export default RepoContext;
Setting up our pages
Now, let's begin by structuring the project. Here is the proposed layout:
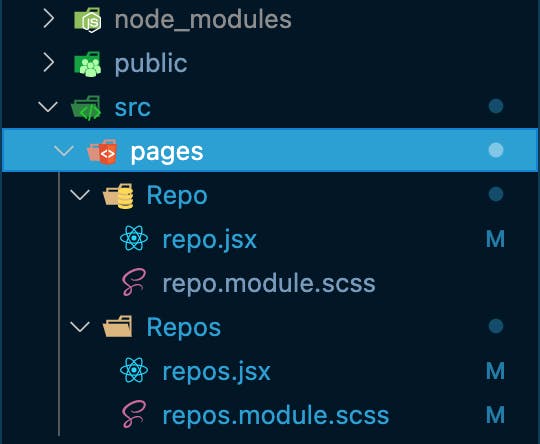
Our first route will be for displaying all of our repositories on GitHub. We will call this route the 'Repos' route.
In the
/srcfolder, create a new folder calledpages. This will contain all the pages for your project.Navigate to the
src/pagesfolder in your project.Inside the
pagesfolder, create a new folder calledRepos.Inside the
Reposfolder, create a new JavaScript file calledrepos.jsx.Also, create a new SCSS file in the
Reposfolder and name itrepos.module.scss."
We would repeat the same for displaying individual repos. We will call this route the 'Repo' route.
In the
/srcfolder, create a new folder calledpages. This will contain all the pages for your project.Navigate to the
src/pagesfolder in your project.Inside the
pagesfolder, create a new folder calledRepo.Inside the
Repofolder, create a new JavaScript file calledrepo.jsx.Also, create a new SCSS file in the
Repofolder and name itrepo.module.scss."
Our project should look like this
404 page not found
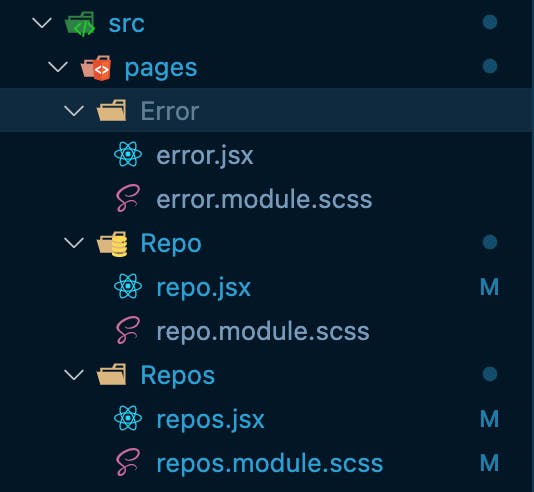
When a user inputs the wrong URL or clicks a broken or non-existent link in your application, you can prevent your app from crashing by creating a custom component to handle these instances. This component called a '404 page not found page, will redirect the user to an appropriate location.
To create this component, we will use the 'pages' folder we previously set up, as this component will act as a page within our application. Let's get started!
Navigate to the
src/pagesfolder in your project.Inside the
pagesfolder, create a new folder calledError.Inside the
Errorfolder, create a new JavaScript file callederror.jsx.Also, create a new SCSS file in the
errorfolder and name iterror.module.scss."
Now our pages are complete and should look something like this
Setting Up React Router
After installation, you can make React Router available throughout your app by taking the following steps:
Open the
index.jsfile in the src folder.Import
BrowserRouterfrom react-router-dom.Wrap the root component (the App component) in BrowserRouter.
Your index.js file should look something like this:
import React from 'react';
import ReactDOM from 'react-dom';
import './index.css';
import App from './App';
import { BrowserRouter } from "react-router-dom";

ReactDOM.render(
  <BrowserRouter>
    <App />
  </BrowserRouter>,
  document.getElementById("root")
);
Now let's head back to our App.js to initialize our routes to the different pages we set up earlier.
import React from 'react'
import { Route, Routes } from "react-router-dom";
import Error from "./pages/Error/error";
import Repo from "./pages/Repo/repo";
import Repos from "./pages/Repos/repos";
//imported from our context
import { RepoProvider } from "./RepoContext";

function App() {
  return (
    <div className="App">
       <RepoProvider>
        <Routes>
          <Route path="/">
            <Route index element={<Repos />} />
            <Route path="/repo/:id" element={<Repo />} />
            <Route path="*" element={<Error />} />
          </Route>
        </Routes>
       </RepoProvider>
    </div>
  );
}

export default App;
Creating Reusable components
React allows you to create reusable components (building blocks) for your project, providing modularization and improving efficiency. This is one of the many benefits of using React in your project.
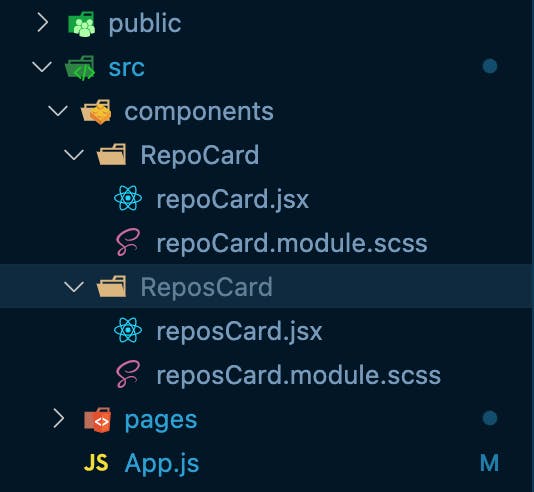
To begin our project, we will create a new folder called components inside the /src folder. This is where we will build our project components.
We will create the RepoCard folder to display individual repos on the Repo page and the ReposCard folder to display all repos on the Repos page. Each folder will have its own jsx and module.scss files.
Our project should look like this.
RepoCard
Let us begin the coding, we would first start with repoCard.js
import React, { useContext } from "react";
import { useNavigate } from "react-router-dom";
import RepoContext from "../../RepoContext";
import { truncateMultilineText } from "../../utils/utils";
import styles from "./repoCard.module.scss";

const RepoCard = ({ date, name, url, stack }) => {
  const navigate = useNavigate();
  //Using react context
  const { getRepos } = useContext(RepoContext);

  const handleClick = () => {
    // 👇️ replace set to true
    navigate("/", { getRepos });
  };
  return (
    <main className={styles.card}>
      <h2>{name}</h2>
      <p>
        Date of Creation: <span>{date}</span>
      </p>
      <p>
        GitHub URL:
        <a href={url} target="_blank" rel="noreferrer">
          <span>{truncateMultilineText(url, 32)}</span>
        </a>
      </p>
      <p>
        Language Used: <span>{stack}</span>
      </p>
      <div onClick={handleClick} className={styles.card__link}>
        <p>Go back</p>
      </div>
    </main>
  );
};

export default RepoCard;
Now let's style it, go to the repoCard.module.scss
.card {
  padding: 10px;
  background-color: #ffc727;
  width: 350px;
  height: auto;
  border-radius: 12px;
  box-shadow: 0 1px 5px rgb(0 0 0 / 0.3);

  p {
    margin: 20px 0;

    span {
      font-weight: 700;
    }
  }

  &__link {
    background-color: #ffc727;
    padding: 12px;
    border-radius: 10px;
    box-shadow: 0 1px 5px rgb(0 0 0 / 0.3);
    color: rgb(51, 51, 51);
    font-weight: 800;
    width: fit-content;
    transition: transform 0.5s;

    p {
      margin: 0;
    }

    &:hover {
      transform: scale(1.05);
      box-shadow: 0 1px 5px rgb(0 0 0 / 0.3);
    }
  }
}
ReposCard
Repeat the same for reposCard.js and reposCard.module.scss
import moment from "moment";
import { Link } from "react-router-dom";
import { truncateMultilineText } from "../../utils/utils";
import styles from "./reposCard.module.scss";

const ReposCard = ({ name, date, index }) => {
  //using moments package to reformat the dates
  const newDate = moment(date).format("MMM Do YY");
  return (
    <div className={styles.card}>
      <div>
        <p>{newDate}</p>
      </div>
      <div className={styles.card__info}>
        <h3 className="name">{truncateMultilineText(name, 34)}</h3>
        <Link to={`/repo/${index}`} className={styles.card__link}>
          More Info
        </Link>
      </div>
    </div>
  );
};

export default ReposCard;
for the styling
.card {
  padding: 10px;
  display: flex;
  align-items: center;
  justify-content: space-between;
  width: 600px;
  background-color: #ffc727;
  margin-bottom: 12px;
  border-radius: 10px;

  transition: transform 0.5s;

  &__info {
    display: flex;
    align-items: center;

    h3 {
      width: 300px;
    }
  }

  &__link {
    background-color: #ffc727;
    padding: 12px;
    border-radius: 10px;
    box-shadow: 0 1px 5px rgb(0 0 0 / 0.3);
    color: rgb(51, 51, 51);
    font-weight: 800;
  }

  &:hover {
    transform: scale(1.05);
    box-shadow: 0 1px 5px rgb(0 0 0 / 0.3);
  }
}
now our reusable components are ready, let's tie the whole thing together in the pages.
Pagination
On our repos page, all of our repositories are currently being displayed. For example if we over 300 repositories, this would result in an almost infinite scroll to the last repo. To solve this problem, we should paginate our data. This means we can determine how much data we want to display per page. Let's build a pagination component to handle this.
We would create this in the component folder, meaning this would also have a pagination.jsx and a pagination.module.scss
import React from "react";
import styles from "./pagination.module.scss";

const Pagination = ({ postsPerPage, totalPosts, paginate }) => {
  const pageNumbers = [];

  for (let i = 1; i <= Math.ceil(totalPosts / postsPerPage); i++) {
    pageNumbers.push(i);
  }
  return (
    <div className={styles.container}>
      {pageNumbers.map((num) => (
        <div
          key={num}
          className={styles.container__page}
          onClick={() => paginate(num)}
        >
          <p>{num}</p>
        </div>
      ))}
    </div>
  );
};

export default Pagination;
Let's style our pagination component
.container {
  display: flex;

  &__page {
    display: flex;
    justify-content: center;
    align-items: center;
    width: 40px;
    height: 40px;
    background-color: #ffc727;
    margin-right: 10px;
    border-radius: 10px;

    p {
      font-size: 17px;
      font-weight: 700;
    }

    &:hover {
      background-color: #b8932c;

      p {
        color: #fff;
      }
    }
  }
}
Repos page
Let's start with the Repos page
import React, { useContext, useEffect, useState } from "react";
import axios from "axios";
import ReposCard from "../../components/ReposCard/reposCard";
import Pagination from "../../components/Pagination/pagination";
import RepoContext from "../../RepoContext";
import styles from "./repos.module.scss";
import Loading from "../../components/Loading/loading";
import SearchTab from "../../components/SearchTab/searchTab";

//our credentials from .env
export const githubURL = process.env.REACT_APP_GITHUB_URL;
export const token = process.env.REACT_APP_TOKEN;

const Repos = () => {
  const { getRepos, search } = useContext(RepoContext);

  //state to manage the entire repos gotten from the API
  const [repos, setRepos] = useState([]);
  //state to manage the repos displayed per page
  const [currentPagePosts, setCurrentPagePosts] = useState([]);
  //state to check if the app is waiting to get a response from the API
  const [loading, setLoading] = useState(false);
  //state to manage the current page in display from pagination
  const [currentPage, setCurrentPage] = useState(1);
  const [postsPerPage] = useState(8);

  useEffect(() => {
    const getTotalRepos = async () => {
      setLoading(true);
      const res = await axios.get(`${githubURL}/users/bigmike12/repos`, {
        headers: {
          Authorization: `Bearer ${token}`,
        },
      });
      const { data } = res;
      setLoading(false);
      setRepos(data);
    };

    getTotalRepos();
  }, []);

  const indexOfLastPost = currentPage * postsPerPage;
  const indexOfFirstPost = indexOfLastPost - postsPerPage;
  const totalPosts = repos.length;

  useEffect(() => {
    const currentPosts = repos.slice(indexOfFirstPost, indexOfLastPost);
    setCurrentPagePosts(currentPosts);

    const searchResult = repos.filter((repo) => repo.name === search);
    setSearchRepos(searchResult);
    const handleCurrentPost = () => {
      getRepos(currentPosts);
    };

    handleCurrentPost();
  }, [repos, search, currentPage]);

  //handle the change of pages
  const paginate = (pageNumber) => {
    setCurrentPage(pageNumber);
  };

  return (
    <main>
      <div className={styles.title}>
        <div>
          <h2>Repos</h2>
          <p>List of my Repositories on GitHub</p>
        </div>

        <SearchTab />
      </div>

      {loading ? (
        <Loading />
      ) : (
        <div className={styles.container}>
          <div>
            {(searchRepos.length === 0 ? currentPagePosts : searchRepos).map(
              (e, index) => {
                return (
                  <ReposCard
                    name={e.name}
                    date={e.pushed_at}
                    index={index}
                    key={index}
                  />
                );
              }
            )}
          </div>

          <div>
            {searchRepos.length === 0 ? (
              <Pagination
                postsPerPage={postsPerPage}
                totalPosts={totalPosts}
                paginate={paginate}
              />
            ) : null}
          </div>
        </div>
      )}
    </main>
  );
};

export default Repos;
Let's style our page
.container {
    display: flex;
    flex-direction: column;
    align-items: center;
    padding: 30px;
    width: 750px;
    margin: auto;
    box-shadow: 0 3px 10px rgb(0 0 0 / 0.1)
}

.title {
    padding: 40px 40px 20px 40px;
    display: flex;
    align-items: center;
    justify-content: space-between;
}
Repo
Let's do with the Repo page for the individual repos
import moment from "moment";
import React, { useContext } from "react";
import { useParams } from "react-router-dom";
import RepoCard from "../../components/RepoCard/repoCard";
import RepoContext from "../../RepoContext";
import styles from "./repo.module.scss";

const Repo = () => {
  const { id } = useParams();
  const num = Number(id);

  const { repos } = useContext(RepoContext);

  const user = repos[0]?.filter((repo, index) => index === num);

  return (
    <main className={styles.container}>
      {user ? (
        user.map((e, index) => {
          const newDate = moment(e.date).format("MMM Do YY");

          return (
            <RepoCard
              date={newDate}
              name={e.name}
              url={e.html_url}
              stack={e.language}
              key={index}
            />
          );
        })
      ) : (
        <ErrorBoundary />
      )}
    </main>
  );
};

export default Repo;
Styling
.container {
  height: 100vh;
  display: flex;
  justify-content: center;
  align-items: center;
  box-shadow: 0 5px 12px rgb(0 0 0 / 0.3);
}
Error Boundary
React has a feature called Error Boundary to handle issues or errors that may cause the application to crash. This is important because software applications, both locally and in production, often experience problems that can result in a poor user experience. Error Boundaries allow you to catch errors in React components and display a fallback UI, preventing the application from crashing.
Since this is a page, we should put it in the pages folder. While you could use the one from the official React documentation, where's the fun in that? It's more enjoyable to create our own.
import React, { Component } from "react";
import styles from "./errorBoundary.module.scss";

class ErrorBoundary extends Component {
  constructor(props) {
    super(props);
    this.state = { hasError: false };
  }

  static getDerivedStateFromError() {
    return { hasError: true };
  }

  render() {
    if (this.state.hasError) {
      return (
        <div className={styles.error}>
          <img src="/No-data.png" alt="404 page not found" />
          OOPS! Something Went Wrong...
          <div className={styles.error__button}>
            <a href={`/`}> Go Back Home </a>
          </div>
        </div>
      );
    }

    return this.props.children;
  }
}

export default ErrorBoundary;
Let us style our custom Error Boundary Page
.error {
    height: 100vh;
    display: flex;
    flex-direction: column;
    align-items: center;
    justify-content: center;

    &__button {
      background-color: #ffc727;
      padding: 12px;
      border-radius: 10px;
      transition: transform 0.5s;
      margin-top: 20px;

      a {
        color: #fff;
        font-size: 20px;
        font-weight: 700;
      }

      &:hover {
        transform: scale(1.05);
        box-shadow: 0 1px 5px rgb(0 0 0 / 0.3);

        a {
          color: #000;
        }
      }
    }

    img {
      width: 500px;
    }
  }
With the completion of this React project, you have demonstrated your ability to use an API, secure and use an access token, and integrate all of these elements together in a cohesive project. Congratulations on a job well done!